
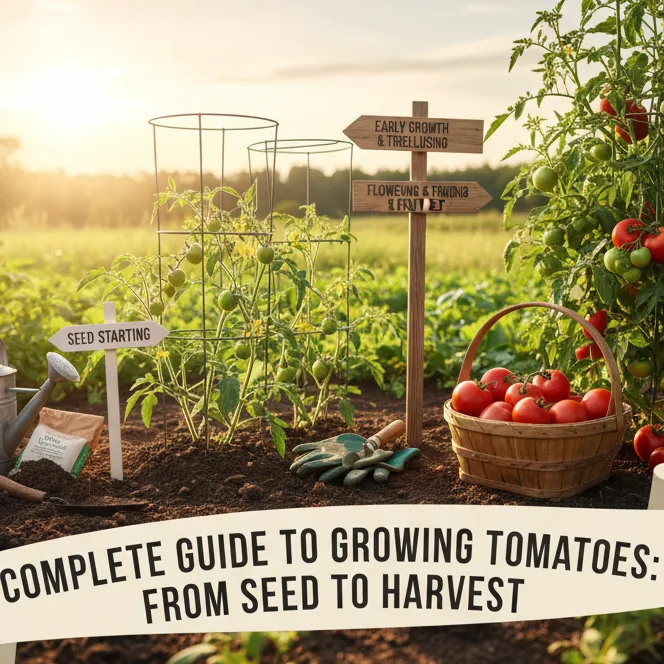
Learn how to grow perfect tomatoes from seed with this comprehensive step-by-step guide covering everything from seed starting to harvest.
Growing tomatoes from seed is one of the most rewarding gardening experiences you can have. Not only does it save money compared to buying transplants, but it also opens up a world of unique varieties you’ll never find at the garden center. This complete guide will take you through every step of the tomato growing process, from selecting the right seeds to harvesting your first ripe tomato.
Why Grow Tomatoes from Seed?
Starting tomatoes from seed offers several compelling advantages over purchasing seedlings. First, you’ll have access to hundreds of heirloom and specialty varieties that simply aren’t available as transplants. Second, seed packets typically cost the same as a single transplant but contain 20-50 seeds. Finally, you have complete control over the growing conditions from day one, ensuring your plants develop strong, healthy root systems.
Choosing the Right Tomato Seeds
Determinate vs. Indeterminate Varieties
Understanding the difference between determinate and indeterminate tomatoes is crucial for planning your garden space and harvest expectations.
Determinate tomatoes grow to a predetermined height (usually 3-4 feet), produce fruit all at once over a 2-3 week period, then stop growing. These compact varieties are perfect for containers, small spaces, and gardeners who want to preserve their entire harvest at once.
Indeterminate tomatoes continue growing and producing fruit throughout the season until frost kills them. They can reach 6-10 feet tall and require sturdy support structures. These varieties provide a continuous harvest from midsummer until fall.
Popular Varieties for Beginners
For first-time seed starters, choose reliable, disease-resistant varieties:
- Cherry Tomatoes: ‘Surefire Red’, ‘Sun Gold’ (indeterminate)
- Slicing Tomatoes: ‘Celebrity’, ‘Better Boy’ (determinate)
- Paste Tomatoes: ‘San Marzano’, ‘Roma’ (determinate)
- Heirloom Varieties: ‘Brandywine’, ‘Cherokee Purple’ (indeterminate)
When to Start Tomato Seeds
Timing is everything when starting tomato seeds. Start seeds indoors 6-8 weeks before your last expected frost date. In most regions, this means starting seeds in late February to early March for outdoor planting in May.
Here’s a quick regional timing guide:
- Northern regions (zones 3-5): Start seeds mid-March
- Temperate regions (zones 6-7): Start seeds early March
- Southern regions (zones 8-10): Start seeds mid-February
Seed Starting Supplies
Gather these essential supplies before starting your tomato seeds:
- High-quality tomato seeds
- Seed starting mix (never use garden soil)
- Seed starting trays or small pots with drainage holes
- Clear plastic dome or plastic wrap for humidity
- Heat mat (optional but recommended)
- Grow lights or sunny south-facing window
- Small fan for air circulation
- Watering can with fine spray or spray bottle
Step-by-Step Seed Starting Process
Step 1: Prepare Your Seed Starting Setup
Fill seed starting trays or small pots with moistened seed starting mix. The soil should be damp but not waterlogged. Create small indentations about ¼ inch deep in each cell.
Step 2: Plant the Seeds
Place 2-3 seeds in each cell to ensure good germination rates. Cover with a light layer of seed starting mix and gently pat down. Label each variety clearly with the planting date.
Step 3: Create the Right Environment
Cover trays with a clear plastic dome or plastic wrap to maintain humidity. Place on a heat mat set to 70-75°F or in a warm location. Tomato seeds germinate best in consistent warmth.
Step 4: Monitor for Germination
Check daily for signs of germination, which typically occurs within 5-10 days. Remove the plastic cover immediately when you see the first green shoots emerging. Move seedlings under grow lights or to a bright, south-facing window.
Step 5: Provide Proper Lighting
Seedlings need 14-16 hours of bright light daily. If using grow lights, position them 2-4 inches above the seedlings and adjust height as plants grow. Without adequate light, seedlings become leggy and weak.
Caring for Tomato Seedlings
Watering
Water seedlings carefully from the bottom by placing trays in shallow water until the soil surface becomes moist. This prevents damping-off disease and encourages strong root development. Allow soil to dry slightly between waterings.
Thinning
When seedlings develop their first true leaves (the second set of leaves), thin to one strong plant per cell by cutting weak seedlings at soil level with scissors.
Fertilizing
Begin feeding seedlings with a diluted, balanced liquid fertilizer (like 10-10-10 diluted to quarter strength) once they develop true leaves. Feed weekly with this weak solution.
Strengthening Stems
Gently brush your hand over seedlings daily or use a small fan to create air movement. This stimulates stronger stem development and prepares plants for outdoor conditions.
Transplanting and Hardening Off
When to Transplant
Transplant seedlings to larger pots (4-6 inches) when they outgrow their starting containers, typically 4-6 weeks after germination. Choose pots with good drainage holes.
Hardening Off Process
Begin hardening off seedlings 7-10 days before your last frost date. This gradual acclimatization process prepares indoor plants for outdoor conditions:
- Day 1-2: Place outside in shade for 2-3 hours
- Day 3-4: Increase to 4-5 hours, some morning sun
- Day 5-6: Full day outside, bring in at night
- Day 7-10: Leave outside overnight if temperatures stay above 50°F
Preparing the Garden Bed
Soil Requirements
Tomatoes thrive in well-draining, fertile soil with a pH between 6.0-6.8. Test your soil pH and amend if necessary. Work in 2-3 inches of compost or aged manure before planting.
Site Selection
Choose a location that receives at least 6-8 hours of direct sunlight daily. Ensure good air circulation to prevent fungal diseases, but protect from strong winds.
Spacing Guidelines
Space determinate varieties 2-3 feet apart in rows 3-4 feet apart. Indeterminate varieties need 3-4 feet between plants with 4-5 feet between rows.
Planting in the Garden
Timing
Plant outdoors only after soil temperature reaches 60°F and nighttime temperatures consistently stay above 50°F. In most areas, this is 1-2 weeks after the last frost date.
Planting Depth
Plant tomato transplants deep, burying 2/3 of the stem. This encourages extensive root development along the buried stem, creating stronger, more drought-resistant plants.
Initial Care
Water thoroughly after planting and apply a 2-3 inch layer of organic mulch around plants, keeping mulch away from stems to prevent pest problems.
Support Systems
Cages vs. Stakes vs. Trellises
Tomato cages work well for determinate varieties and small indeterminate types. Choose sturdy cages at least 5 feet tall for indeterminate varieties.
Stakes require regular tying but provide excellent support for indeterminate varieties. Use 6-8 foot stakes driven 12-18 inches into the ground.
Trellises work excellently for indeterminate varieties and can support multiple plants. Build or buy sturdy trellises that can handle 20+ pounds of fruit.
Installation Timing
Install support systems at planting time to avoid disturbing established root systems later.
Ongoing Care Throughout the Season
Watering Best Practices
Tomatoes need consistent moisture, approximately 1-2 inches per week. Water deeply but less frequently to encourage deep root growth. Water at the base of plants to keep foliage dry and prevent disease.
Use soaker hoses or drip irrigation for most efficient watering. Avoid overhead sprinklers, which wet foliage and promote fungal diseases.
Mulching Benefits
Apply organic mulch around plants to:
- Retain soil moisture
- Suppress weeds
- Regulate soil temperature
- Prevent soil-borne diseases from splashing onto leaves
Good mulch options include straw, shredded leaves, grass clippings, or commercial organic mulches.
Fertilizing Schedule
At planting: Mix compost or aged manure into planting holes.
3 weeks after planting: Apply balanced fertilizer (10-10-10) according to package directions.
When first flowers appear: Switch to low-nitrogen fertilizer (5-10-10) to encourage fruiting over foliage growth.
Every 3-4 weeks: Continue feeding with low-nitrogen fertilizer throughout the season.
Pruning and Maintenance
Pruning suckers: Remove suckers (shoots growing between main stem and branches) on indeterminate varieties to improve air circulation and fruit size.
Lower leaf removal: Remove leaves touching the ground and any yellowing or diseased foliage throughout the season.
Tying up branches: Secure heavy fruit-laden branches to supports using soft ties or strips of fabric.
Common Problems and Solutions
Blossom End Rot
Dark, sunken spots on the bottom of tomatoes indicate calcium deficiency, usually caused by inconsistent watering. Maintain even soil moisture and ensure adequate calcium in soil.
Cracking
Fruit cracking occurs when inconsistent watering causes rapid fruit expansion. Maintain consistent soil moisture with regular watering and mulching.
Yellowing Leaves
Lower leaf yellowing is normal as plants mature. However, widespread yellowing may indicate watering issues, nutrient deficiency, or disease. Adjust care practices accordingly.
Slow Ripening
Cool weather, insufficient sunlight, or over-fertilization with nitrogen can delay ripening. Reduce watering slightly and ensure plants receive maximum sunlight.
Pest and Disease Management
Common Pests
Hornworms: Large green caterpillars that can defoliate plants quickly. Hand-pick or use Bt (Bacillus thuringiensis) spray.
Aphids: Small green or black insects that cluster on new growth. Control with insecticidal soap or beneficial insects.
Whiteflies: Tiny white flying insects on undersides of leaves. Use yellow sticky traps and insecticidal soap.
Disease Prevention
Crop rotation: Don’t plant tomatoes in the same location two years in a row.
Air circulation: Proper spacing and pruning improve airflow and reduce fungal diseases.
Clean gardening: Remove plant debris and sanitize tools between uses.
Resistant varieties: Choose varieties bred for disease resistance in your region.
Harvesting Your Tomatoes
Determining Ripeness
Harvest tomatoes when they reach full color but are still firm to the touch. Fully ripe tomatoes will have uniform color and yield slightly to gentle pressure.
Harvesting Techniques
Regular harvesting: Pick tomatoes every 2-3 days during peak season to encourage continued production.
Green tomato harvesting: At season’s end, harvest green tomatoes before first frost. Many will ripen indoors if stored in a cool, dark place.
Storage tips: Store ripe tomatoes at room temperature for best flavor. Refrigerate only if you must extend storage life, knowing that cold temperatures reduce flavor.
End-of-Season Care
Before the first frost, harvest all remaining fruit and remove plants from the garden. Compost healthy plant material but dispose of diseased plants in household trash to prevent disease spread.
Seed Saving for Next Year
If you grew open-pollinated (non-hybrid) varieties, you can save seeds for next year’s garden. Choose seeds from the best-tasting, healthiest fruits. Remove seeds, ferment in water for 3-5 days, then clean and dry thoroughly before storing in a cool, dry place.
Troubleshooting Common Beginner Mistakes
Starting seeds too early: This leads to leggy, overgrown transplants. Stick to the 6-8 week timing guideline.
Insufficient light: Weak, spindly seedlings result from inadequate lighting. Invest in grow lights or choose the brightest available window.
Overwatering: More seedlings die from too much water than too little. Allow soil to dry slightly between waterings.
Planting outdoors too early: Cold soil and air temperatures stress plants and delay growth. Wait for consistently warm conditions.
Inadequate support: Heavy fruit production requires sturdy support systems installed at planting time.
Maximizing Your Harvest
To get the most from your tomato plants, maintain consistent care throughout the season. Regular watering, proper fertilization, and prompt harvesting encourage maximum production. A single indeterminate plant can produce 10-15 pounds of fruit over the season with proper care.
Consider succession planting by starting new seeds every 2-3 weeks through early summer for extended harvest periods. This technique works especially well with determinate varieties.
Growing tomatoes from seed to harvest is a journey that rewards patience and attention to detail. With proper timing, care, and the techniques outlined in this guide, you’ll soon be enjoying sun-warmed, homegrown tomatoes that far surpass anything available in stores. The satisfaction of growing your own food from tiny seeds to bountiful harvests makes every step of the process worthwhile.
 How to Grow Lavender: Planting, Care, and Harvesting
 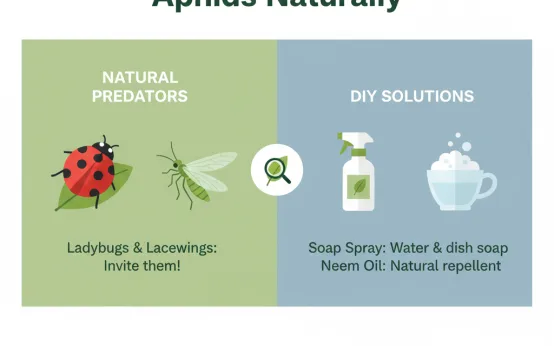 Dealing with Garden Aphids Naturally
 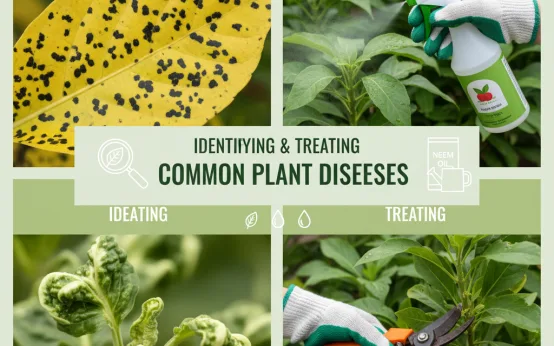 Identifying and Treating Common Plant Diseases